In late 2012 after quickly finding myself back into Amateur Radio after an absence of around 14 years and having moved to Florida I found myself trying to find a way of listening to bands back in my home of England, after a lot of searching I discovered RemoteRig.com
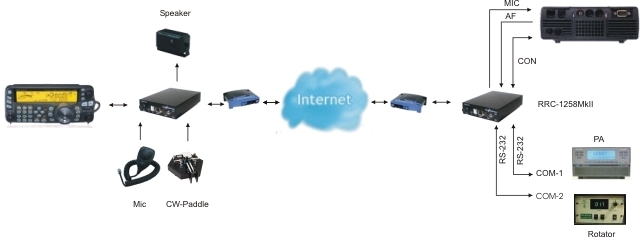
The Remoterig RRC-1258MkII is developed specially for remote control of Amateur radio stations via the Internet, in and user friendly and cost-effective way. The Remoterig units are normally used in pairs, one is connected to the radio and the other is connected to the control equipment. The system is unique in the way that no PC is needed, both voice and data communication is handled by the two units. RRC-1258MkII can be configured to work together with most Amateur radio stations available on the market from ICOM, Kenwood, Yaesu and Elecraft.
I try and visit England twice a year around Summer/Christmas so I had it in mind to setup the RemoteRig station on my next visit to the motherland in December 2012. Then legalities struck me on whether what I was about to do was against my licencing, so after a quick call to Ofcom to confirm and read of my rules and regs which had changed quite a bit since in my 14 years absence allowed for a station to be run remotely as long as no one can gain access to it and use it whilst the station licence holder is not around, this wasn’t a problem as my parents have no interest and the front of the radio would be located in Florida!
Equipment
So after purchasing the RemoteRig RRC-1258MkII, I then found on eBay a ICOM706MRK2G , I purchased the 706 because it had functions of HF, 2 Mtrs, 70 Cms, 6 Mtrs and recently discovered it has been unlocked to allow 4 Mtrs. There are a lot more radios available to use with the RemoteRig system but this seemed to be the most logical choice for me due to its coverage.
Whilst still in Florida I configured both RRC-1258MkII units by plugging into my home wired network, they use Ethernet connections rather than wireless which is always my preference, the units have static IP addresses which you log-in with the default user/pass and then set the units to talk to each other over the network, I have a guide made by Mitch here if anyone would like a copy, I am sure he would not mind. The biggest pain when setting up the RR is needing to buy a separation cable for the 706 and cut it in half and put a RJ45 plug on both ends, believe me when I say this isn’t as easy as it sounds, the wire inside the cable isn’t like the cat5 solid wire its the fiber type wire which trying to solder to is a real pain, in the end I opted to cut a cat5 cable in half and using the RR website wiring diagrams soldered the cat5 cables to both ends of the separation cable, I went through a lot of heat shrink for this job! But after using a multimeter and checking both ends they finally worked!
Flying back to England
Had my flights booked for a three week holiday back to England, and I took all the RR the 706 though as hand luggage, sure as hell wasn’t going to put it in my cases and find over $1000 worth of equipment broken or worse gone! Luckily no problems through immigration and arrived safely back home. After arriving back for which seems like a few hours and having zero patience I stated putting together my RemoteRig station. This included running a feed of cat5 cable from my bedroom to the loft where the old Astron 25 amp PSU, RR and back of the IC706MK6 would be located.
Antennas
Before I left Florida I made sure I had ordered a good Antenna for my station, I finally decided on using eHam’s review system a Comet GP-15 for use on 6 Mtrs, 2Mtrs and 70Cms, I purchased a 6″ stand off bracket from eBay UK too and used this to mount the GP15 on the back of my new motorised Satellite dish I setup the Summer before.
I also happened to still have my old Solarcon Antron 99 left over from my old CB days that I thought would be great on 10 Mtrs with a little tuning of the rings and to listen on HF. The only problem was Antron 99 had been lying in the garden amidst the grass, mud, rain and other elements , I wondered if it would even still work after 10 plus years of being down off the roof and maybe soaking in moisture. So after making a few marks on the wall walking it through the house with my Dad to upstairs in the loft I bolted it back to the bracket my old motorised satellite dish was connected to back in the days.
So with both antennas in place and after a few trips to Maplins to purchase some over priced PL259′s and a N Type to PL259 connection (which BTW comet claims to be a SO239 connector) I have everything in place. The Antron 99 connected to the HF port on the 706 and the Comet GP-15 Tri band to the UHF/VHF port on the 706.
Testing
Set the face of the radio and the 2nd RR downstairs in my bedroom which needs its own PSU to run so I have an old 5 amp supply I used although it really only needs about an amp or less to run I powered everything up and it connected with upstairs and that familiar ICOM power up bleep sounded and I was off ![]() Mission accomplished.
Mission accomplished.
After a few days was able to get the RR off the LAN and over to my brothers home to test over Internet and after opening the router up to allow for a few ports to be forwarded it worked just as well as the LAN connection. I then spent the rest of the holiday in England programming in all the local 2 and 70 repeaters and naming them which takes a little while on the 706.
After a great Christmas visit spending time with the family in England and a few days into the new year we arrived safely back in Central Florida, I had made arrangements to meet with Keith 2E0MKM on 2Mtrs to test the RemoteRig from its new home Florida and just as in England it worked amazingly well, just like being back home!
Upgrades June 2013
This June I made some big additions to the remote shack, first of all I added four new antennas.
A TrueTalk G5RV that I purchased stateside
An M0CVO off center fed dipole
4 Meter excaliber II (basicly a trimmed down 11 Mtr half wave)
Solarcon IMAX 2000 – tunes 20Mtrs to 10Mtrs this replaced the old Antron 99.
Moonraker 2/70cm beam
Automatic Antenna Switcher
With these new antennas I needed a way to switch between them and luckily Remoterig.com had just released a 10 way 0-50Mhz remote antenna switcher which like the Remoterig has the ability to log in via a web GUI to access the antennas.
I then discovered the above unit could be set to automatically switch antennas when tuning the bands but it needed a CAT interface, the hang up was that it had to be RS232 and have an external power source to drive it as the remote rigs com ports are not like PC’s and don’t have power coming from them, I found plenty of cheap interfaces but most were USB and powered by USB so I found via Walters and Stanton a Icom CT-17 CAT Interface in stock at just under £100 so I ordered it and after a few setting changes to the 1069 switcher I was able to auto switch.
For the HF side I needed an ATU that I could operate remotely so purchased a Icom IC-180 from eBay for just over £200 which matched the IC-706Mk2G. On paper it seemed perfect and all I had to do was press the tune button on the front of the Icom and it would tune at the radio end but in practice it was a nightmare, it appears these ATU’s do not tune G5RV’s well at all, or 10 Mtr Verticals either and if your SWR over 2:1 it won’t tune at all. Due to the need of having to remotely tune I thought I was stuck but luckily after doing more research I found the LDG IT-100 which would solve all my problems and is designed for the IC-706 and came with the a cable to plug straight in. I use an LDG ATU in Florida so I know they worked well on wire antennas and the end result was it tuned the IMAX and G5RV great.
2/70 Beam
I always wanted to install a 2/70 beam and this trip I was able to, I purchased a Yaesu G450C rotator and controller and a Moonraker 2/70 mini beam (1mtr) , but how do you control it all remotely? After researching I found www.erc.com which is an interface kit that installs inside of the rotators controller and which enables you control your rotator via your PC using the supplied software or using something like HRD. In steps RemoteRig again to save the day…using the 2nd com port on the Remoterig I could control the ERC interface at the control end from com2 RS232 port to a serial to USB adaptor. The serial port com2 is slightly different to com1 that the rs232 pins 2 and 3 are switched and had to figure this into account when wiring.
Enter 6 Meters
The Icom has two antenna inputs (so239) one for HF and the other for VHF , I purchased the Comet GP15 Tri band at Xmas but at the time wasn’t able to use 6Mtrs on it as that was meant to be fed into the HF input which was already occupied with the A99. So this trip I purchased a comet duplexer for the IC706 series which splits the antenna into HF and VHF. I have my Comet feeding into the duplexer one side feeding into the VHF/UHF port on the Icom for 2/70. The HF side of the duplexer which carries 6Mtrs is going into the HF auto antenna switcher and will be automatically switched each time I drop to 50mhz.
Two UHF/VHF antennas but how to switch them?
After ordering the beam the realization hit me, how will I switch between the Comet and the Yagi remotely as the Auto antenna switcher is only for HF. Back to the drawing board again, and Mike from RemoteRig suggested a coax relay…having never used one before I was a little dubious. With time running out I quickly ordered one on eBay UK and the seller kindly mailed it next day for me, it used 3 SMA connections (antenna 1, input and antenna 2). Ordered the SMA to so239 adapters again via a nice chap on eBay uk who shipped next day. The relay arrived and looked pretty simple, it was 12v actuated so soon as the voltage was connected it switched over to the 2nd antenna and when it had no power it switched to a normally closed state which connected to antenna 1.
To switch it remotely it was suggested I could use the unoccupied I/O port on the front of the radio remoterig. This was a little hard to get setup but thanks to Mike from RR, Kostas SV1DPI and especially Ken M1DYP who always saves me with projects like this and at 2am didn’t disappoint. I was able to build a small circuit using a 5v reed relay that was perfect for the job. Now using the RR web GUI I can switch the I/O port on/off which will switch the 12v supply on/off to coax relay between the Comet and Yagi. Also I understand using the control RR I am able to install a physical switch but I have not got around to that one yet.
After all was done I rearranged the antenna switching a little by adding the coax relay before the duplexer so I can switch between the two antennas to choose which goes into the duplexer and the VHF/UHF port.
More updates coming soon.
 Orlando Time
 London Time